How to Troubleshoot Cloudflare and WordPress
This post discusses basic troubleshooting of Cloudflare and WordPress.
For additional information troubleshooting Cloudflare and SSL, see our HTTP to HTTPS migration case study.
For the past six years, Cloudflare has given our website an incredible performance boost as we shared in Part One of our Cloudflare series.
But In the weeks following the set up of Cloudflare we ran into a few technical issues that we document here.
This post will explain the problems and solutions as we look at how to troubleshoot Cloudflare and WordPress. Hopefully, this post will help you, too!
Let’s start with the initial errors received within 24 hours of activating Cloudflare.
Quick Links
Cloudflare 522 or 523 Errors
Disqus Comments not Showing
Caching Issues
403 Error
Unable to Comment on Other Blogs
Cloudflare Page Rules
404 Errors
Cloudflare 522 or 523 Errors
When you first set up Cloudflare for your website, it can take awhile for the nameservers to propagate and you might find yourself receiving Cloudflare errors.
For example, when trying to load a web page you may receive 522 or 523 errors and your website appears offline. This can be an indication that Cloudflare is having problems connecting to your server, but that is not always the case.
For example, our site appeared offline and the following message would display at the top of the home page:
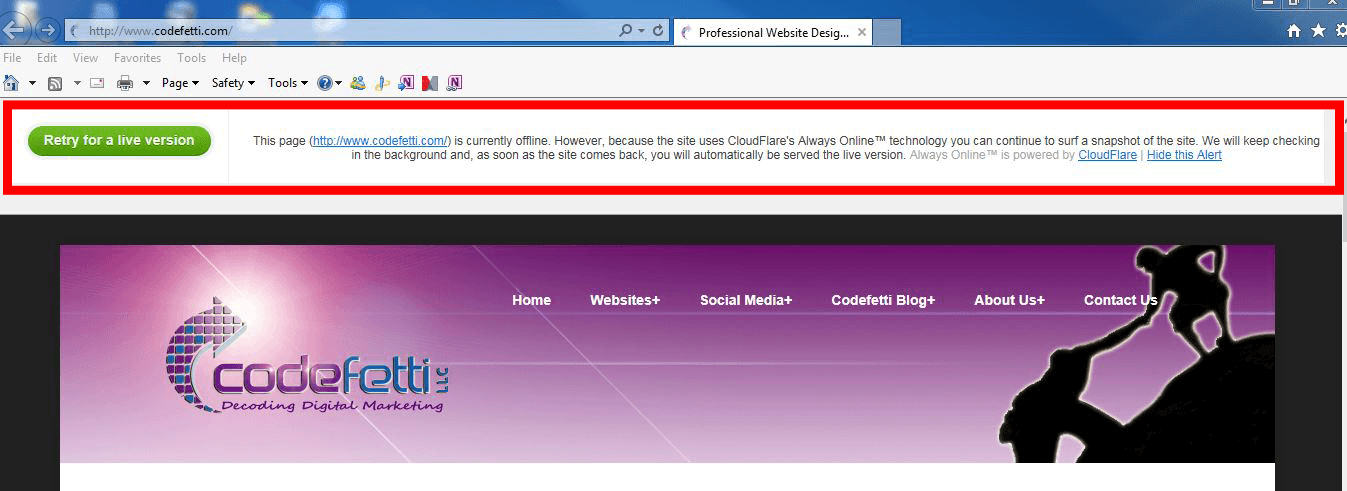
This was an interesting problem because neither Cloudflare nor our hosting company could see any reason for the error messages being thrown. Even after the propagation had happened, there were some connectivity issues.
This took a bit of trial and error to troubleshoot, but finally after running traceroute we learned that the issue was with our Internet Service Provider (ISP) — not our hosting company or Cloudflare.
However, after a few days everything settled down, and Cloudflare has been very stable since then.
So give at least 48 hours for your site to propagate.
Disqus Comments not Showing
Even though Disqus comments were approved, they weren’t appearing.
If you simply clear the page cache, the comments will appear. This was not an issue prior to Cloudflare, and it’s quite simple to resolve.
Caching Issues
If page additions or edits are not showing up immediately, again simply clear the cache.
However, sometimes it’s necessary to put Cloudflare into development mode.
This allows you to temporarily suspend Cloudflare caching while you are making changes to content. When in development mode, you will see those changes immediately.
So if you can’t see your changes by refreshing the page cache from WordPress, try using the development mode setting in Cloudflare’s dashboard to see the changes immediately.
403 Forbidden Error
After setting up Cloudflare you may be locked out of your website with a 403 Forbidden Error.
Many WordPress owners set up their .htaccess file to stop brute force attacks by blocking access to the WordPress login page.
Our .htaccess was configured to deny wp-login access to all IP addresses but a few (including my own). However, this tactic wasn’t working under Cloudflare.
These attempts failed to resolve the 403 error:
- Whitelisting Cloudflare’s IP ranges
- Whitelisting our IP
We finally submitted a support request to Cloudflare. Keep in mind that if you are on Cloudflare’s free plan, you are last on the list for support.
Understandably, technical support priority is given to Enterprise, Business and Pro customers in that order followed by customers on the free plan.
So it can take between 24-48 hours and beyond to receive a response from support.
Cloudflare support responded to our request with 3 questions which we answered as follows:
- What IP address is triggering the 403? Our IP.
- Are you using any security plugins that restrict access to specific IPs? No, our IP is properly whitelisted wherever needed.
- Do you have mod_cloudflare installed on the server to restore visitor IP? Since our hosting company was a Cloudflare partner, mod_cloudflare most definitely was installed.
Finally, there was a breakthrough. As suspected all along, the 403 error was coming from the origin server directly (our host) and was related to the .htaccess code set up. Because Cloudflare acts as a reverse proxy, it appeared that all connections were coming from their IPs thus blocking requests from our IP.
To correct this issue, the following code needed to be added to the .htaccess file with the actual IPs replacing the placeholders “1.2.3.4” and “2.3.4.5”:
Deny from All

SetEnvIF X-Forwarded-For "1.2.3.4" AllowIP

SetEnvIF X-Forwarded-For "2.3.4.5" AllowIP

Allow from env=AllowIP

Allow from 1.2.3.4

Allow from 2.3.4.5
With this code, the IPs are taken from the X-Forwarded-For header, thus eliminating the 403 error.
To give a further explanation as to how this works:
Once a CDN is enabled, a page request is not sent directly to the hosting provider but to Cloudflare. Cloudflare now serves the content on behalf of the hosting provider.
Similarly, from the hosting provider’s point of view, all requests appeared to be coming from the Cloudflare server IPs, and not from the users that are reading a blog post or web page.
But there is a way to find out what the originating IP address is instead of the “mock” IP address that Cloudflare is giving out to the general public. That is where X-Forwarded comes in; it pinpoints who the real originating IP address is.
SetEnvIF is the abbreviation for “set environment if”.
So the second directive in the code above is translated (very loosely) to “If the REAL sender’s address matches the address 1.2.3.4, please feel free to do whatever you want.”
Unable to Comment on Other Blogs
Cloudflare integrates nicely with WordFence and most plugins.
However, if you run into unexpected issues when supplying your website URL on other websites, it could very well be that Cloudflare’s IP is being blocked.
To solve this, once Cloudflare is activated for your site, make sure to install the Cloudflare plugin for WordPress.
This plugin restores the original visitor IP instead of using Cloudflare’s proxy, which may be mistaken as a spammer by other servers.
Until you install the Cloudflare plugin, your comment submissions on another’s blog may fail with a redirect loop.
Cloudflare Page Rules
On the free plan, you are allowed up to 3 page rules per domain. You may want to set up redirects or disable wp-admin page caching or wp-login page caching.
There really isn’t any reason to cache the admin page since only admin, authors, or editors have any business going to that page.
We had no issues accessing the login page, but did hear other people had problems logging into WordPress after activating Cloudflare. By disabling the wp-login for page caching, their problem was resolved.
404 Errors
Make sure you test your site adequately after enabling Cloudflare. Twice we have found all pages but the home page returning 404 errors once Cloudflare was activated.
The first time we thought the website was hacked and had Sucuri do a malware check and clean-up. Sucuri couldn’t find any major issues with the site and did some minor maintenance.
But when the same issue occurred on a second website, it appeared to be more of a permalinks issue.
We were able to resolve the 404 errors be simply saving the permalinks. Go to Settings>Permalinks and click Save Changes (even though you did not make any changes.) That did the trick.
In Summary
All in all, the Cloudflare and WordPress integration went pretty smoothly for us and it should go well for you, too.
You shouldn’t run into any major issues especially if your hosting provider is a Cloudflare partner.
Even though you can activate Cloudflare in your cPanel, signing up directly with Cloudflare will simplify administrative tasks should you decide to change your hosting provider.
Remember that traceroute is a great tool to help you uncover where the bottlenecks or disconnects might be and is often required by Cloudflare support to help you resolve technical issues.
Cloudflare’s dashboard is easy to navigate.
It allows you to put your site in development mode so that any uploaded files or images are seen immediately.
Keep in mind that free plan users are the last to receive support.
Be patient and try to troubleshoot issues on your own; it’s a great way to learn!
Hopefully, you will find this troubleshooting guide useful. Have you encountered any other issues with Cloudflare and WordPress?