Gravity Forms Tips and Tricks

In Part One of our Gravity Forms series, you learned how to install Gravity Forms and activate the license.
In Part Two you learned how to use the shortcode to add a form to your WordPress post or page. You also learned how to style Gravity Forms.
In this final installment of our Gravity Forms series, you’ll learn Gravity Forms Tips and Tricks including:
How to Troubleshoot Email Notifications
How to Redirect to PayPal upon Form Submission
So let’s get started!
Gravity Forms Tips and Tricks
How to Troubleshoot Email Notifications
A great feature of Gravity Forms is that it retains a copy of each form submission. So every time a user completes the form and clicks the submit button, a notification is sent to the WordPress administrator and a copy of the entry is kept in the WordPress dashboard.
These notifications are important because they will alert you to the fact that someone has tried to contact you via a form on your website.
To set up the Gravity Forms notification, simply log into the dashboard, click on Forms , select your contact form, click Edit and then click Notifications.
Here’s a quick screen cast to show you where to find this:
Here’s what the Notification Settings form looks like:
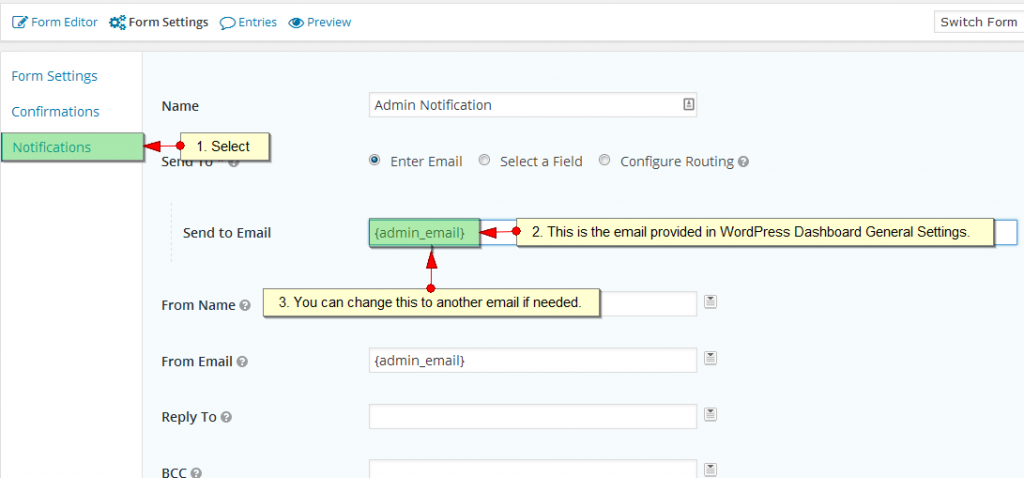
Make sure to enter a valid email address that is associated with your domain in the “Send to Email” field.
If you enter an email address such as Yahoo or Gmail, you will most likely experience email delivery issues since many Internet Service Providers associate those with spam. So they will block the email delivery.
So make sure you have a valid email address associated with your domain. And you can always send a copy of the email to an alternate email address via the BCC field in the Notifications Setting Form.
How to Prevent Spam
It’s really important to add measures to prevent spam from getting through your form submissions.
And Gravity Forms gives you two options.
Anti-Spam Honeypot
Gravity Forms has a setting to enable an anti-spam honeypot.
It’s not enabled by default so make sure you go to Forms and click Edit under your contact form.
Then click the Form settings tab and scroll down to the bottom where you will find additional Form Options.
Check the Anti-spam honeypot checkbox.
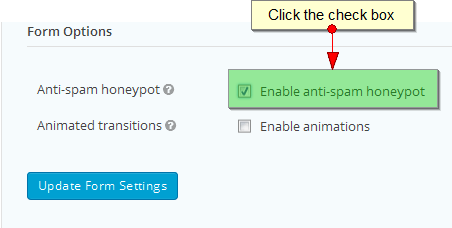
This option adds an invisible field to your form. Bots get tricked into filling in the hidden field, which alerts the form processor that it’s spam.
It’s simple and doesn’t require your users to do anything more than fill out the required information on your form.
However, you may find this isn’t foolproof for your site. In that case, I strongly recommend that you implement reCAPTCHA.
This is not the annoying CAPTCHA forms of yesterday where you have to jump through hoops to select the appropriate images to prove you’re human.
This is reCAPTCHA – the next generation of CAPTCHA which allows you to put a checkbox or invisible field on your form.
I recommend the invisible reCAPTCHA and I’ll show you how next.
Invisible reCAPTCHA
Gravity Forms lets you put a reCAPTCHA field on your contact form. This is available under Form General Settings.
But first you’ll need to obtain a Site Key and Secret Key from your Google account Admin console. Learn more about obtaining your site and secret keys from Google.
I recommend you choose the Invisible option, which makes it easier on your website visitors.
Otherwise, with the checkbox option, they need to take an extra step of checking that box before submitting their contact form.
Once you have the site key and secret key, return to Gravity Forms and scroll down to reCAPTCHA settings to add them to your site.
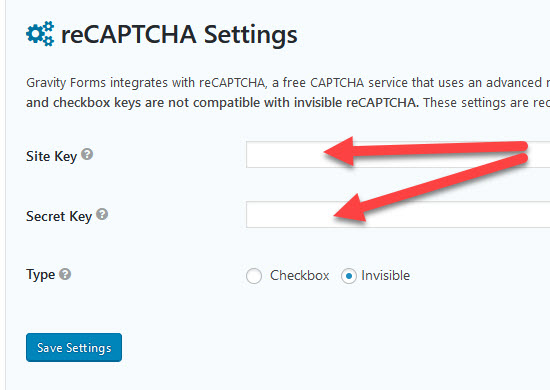
Click Save Settings.
The final step is to return to your contact form and open the Advanced Fields to add the CAPTCHA field to your form:

When a visitor lands on your Contact Page, they will see a little reCAPTCHA logo in the lower right corner that says “Protected by reCAPTCHA.”
And that should stop the spam submissions!
How to Redirect to PayPal upon Form Submission
The last tip I want to share is how to redirect to PayPal upon a form submission.
When a form is submitted, you have three confirmation options. The default confirmation displays a text message that says “Thanks for contacting us! We will get in touch with you shortly.”
However, Gravity Forms also gives you the option to redirect to a thank you page on the website or to another URL.
This is perfect if you want to route your visitor to PayPal to complete payment for a purchase on your website.
Simply go into Form Confirmations, click Redirect and enter the Redirect URL:
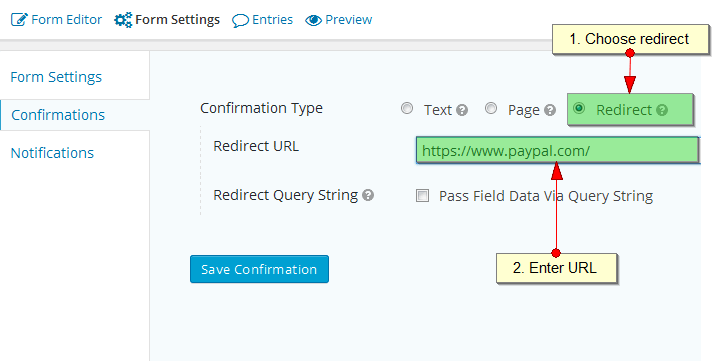
Click Save and you’re redirect is now set up.
In Summary
In this final installment of our series, you learned how to troubleshoot email notifications, how to enable the anti-spam honeypot, and how to redirect to another website, such as PayPal.
Please do let me know if you have any questions in the comments below. Feel free to share any tips or tricks you’ve learned along the way, too!
Image Credit: Fotolia