Adding SSL to a WordPress Site: Part 2, 4 Steps to Configure HTTPS

In part 1 of this series we looked at what SSL is, why you would want it, and how to get it installed on your site.
The next thing you need to do is to get WordPress using SSL secure connections instead of the default insecure connections. In this post, you’ll learn the 4 steps to configure HTTPS on your WordPress site.
Backup Your Website
- Never forget to backup your entire site before you make any changes to prevent you from losing everything if something goes wrong.
- If you have any caching plugins and/or a CDN enabled, make sure you disable or turn them off.
Some of my clients choose to use SSL on their whole site but some clients believe having SSL, also called HTTPS, connections slow down their site. So they choose to use SSL on only some pages, for example, a checkout page that captures a user’s credit card.
While it’s true that pages used to render slower in HTTPS connection, sites currently under SSL can now take advantage of HTTP/2 for enhanced performance and security. So HTTP/2 has solved the issue of slow HTTPS connections and a slow connection is really a non-issue for site owners today.
In this article I am going through the steps for using SSL on an entire WordPress site.
Here are the 4 basic steps that need to be done…
Step 1: Let WordPress Know to Use HTTPS
First, we need to let WordPress know we want to use SSL/HTTPS connections. To do that, login to your WordPress dashboard and go to the “Settings > General” page.

Change both the “WordPress Address” and “Site Address” URLs to use “https://” instead of http:// and save the settings. When you do this WordPress will automatically use secure connections for their own links and pages.
After you’ve done that, you’ll be automatically logged out of your site.
Don’t worry, this is because the site is now using “HTTPS” and you were previously logged in using a “HTTP” connection. From the browser’s point of view, these are essentially two different domains.
Step 2: Force all Posts and Pages to use HTTPS
Now that your site is configured to use with HTTPS, you want to make sure that ALL of your pages and posts are loaded via HTTPS.
If your blog is not new, odds are you have many links to it, including Google search result links, that use insecure “HTTP” connections. What we need to do is to automatically change any insecure connection attempts to be secure.
In other words, when someone clicks a link for an insecure connection we need to automatically switch to a secure connection without the person having to do anything or seeing an error message.
Forcing HTTPS Connections Using a Plugin
Many hosting companies and site owners take the easy route by using Really Simple SSL WordPress plugin.
But I don’t recommend this approach at all.
That’s because every hosting environment is different. There is a small chance this plugin may not work exactly as expected.
And your site needs to be secured from the ground up – not just patched with a plugin.
Forcing HTTPS via .htaccess
This section is for those who have no qualms about editing their Apache .htaccess file. Please note this won’t be applicable to you if your web server isn’t Apache – fortunately most hosting companies running WordPress use it.
First, let’s understand that the .htaccess file contains instructions, called directives, that tell your web server how to behave in certain situations and directly affects how your website functions.
That sounds pretty powerful and potentially dangerous, doesn’t it? Guess what, it is.
But there is always the first time for everything and you’ll never learn if you don’t try.
To start, find your .htaccess file, it’s normally in the root folder of your WordPress site.
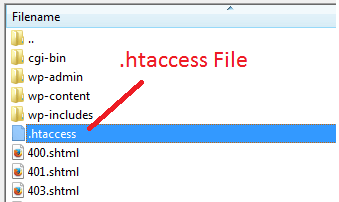
Before you edit the file, make sure you make a copy of it and rename it to something like .htaccess-old.
This way if something goes wrong, you can easily get your site back to the way it was before your edited the file.
Next, deactivate any caching plugin that is running.
Then add the following code at the top of the .htaccess file:
<IfModule mod_rewrite.c>
RewriteEngine On
RewriteCond %{HTTPS} off
RewriteRule (.*) https://%{HTTP_HOST}%{REQUEST_URI} [R=301,L]
</IfModule>
To test that this is working correctly, try visiting one of your WordPress pages (not your home page) using an insecure HTTP URL. If it automatically changes to HTTPS, then you know this code is working correctly.
Understanding How It Works
If you’d like to understand how the above htaccess code works, read on. Otherwise, you can skip to Step 3.
Basically, the code is saying,
- Turn on the rewriting engine
- Is the connection already on HTTPS?
- If so, then redirect everyone to HTTPS protocol.
Step 3: Update All of the URLs Inside Your Posts and Pages
You have an SSL certificate, you’ve updated your site URL, and you are forcing all traffic to use HTTPS connections.
Yet if you go to an existing page on your site, you might see a YELLOW icon over the lock or an alert that says you have insecure elements — or mix-content errors — on your page.

This happens because all the time that you were building your site using HTTP, all of your images, scripts, stylesheets and other assets were loaded into your pages and posts using “HTTP.”
In order for your web page to be considered completely secure, all of your elements need to be sent over SSL.
You can change everything to use HTTPS or use what are called “protocol relative URLs.”
For the remainder of this post, we’ll look at updating all of your URLs and how you can do it.
- You can go to each page and widget and manually update every URL – OR –
- You can use a plugin such as “Better Search Replace” – OR –
- You can use an external script to handle the URL replacements. For example, an SQL UPDATE query that will find and replace all of the URLs in the database.
For our example below, we will use a plugin.
Here are the steps we need to do:
- Install and Activate the Better Search Replace plugin
- Go to “Tools > Better Search Replace”
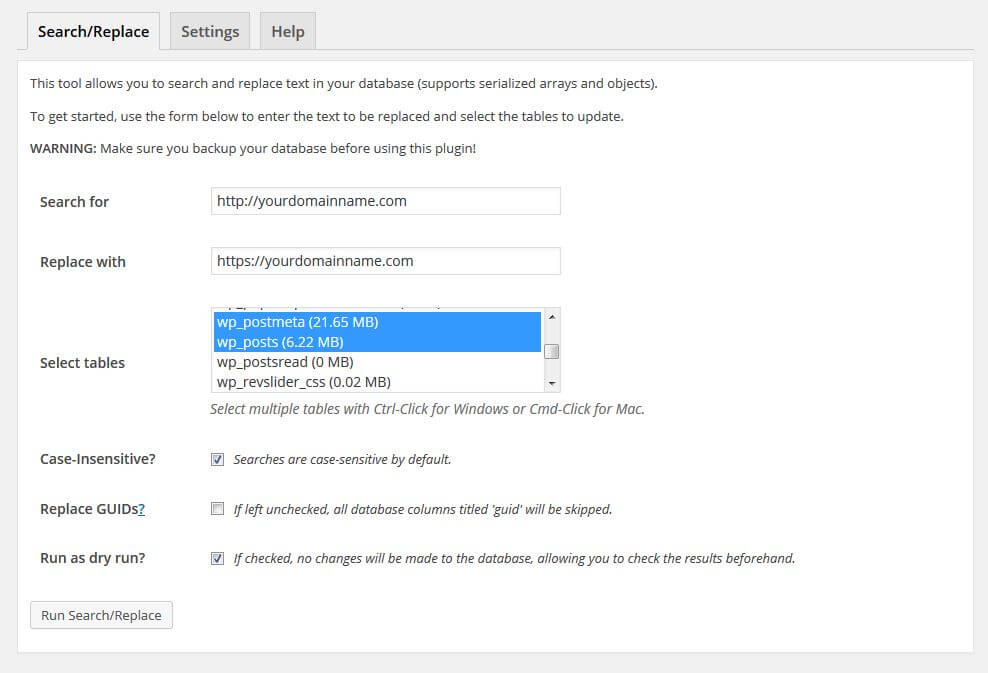
- In the “Search/Replace” tab, do the following:
- Search for = http://yourdomain.com
- Replace with = https://yourdomain.com
- In the “Select tables” area, select both wp_postmeta and wp_posts. Some blogs have table prefix different than “wp_”, but as long as the table name ends with “postmeta” and “posts” it is what you want.
- Select “Run as Dry Run.” I recommend doing a dry run before actually updating the URLs.
- Note the number of updates that will be done and look at the details provided if you wish.
- Once you are satisfied with the dry run results, go back and unselect “Run as Dry Run.”
- Hit “Run Search/Replace”
This plugin will search through all of your posts and pages and updates all the internal links it finds, and sets their protocol to “HTTPS”. Don’t forget to check for domain with “www” and without “www”.
Fixing Insecure Elements
Despite your best efforts, sometimes when you test your site you will still see the “insecure elements” error.
Unfortunately, there isn’t a easy fix. Although WordPress core files makes sure to load in the right images, scripts or stylesheets using the correct protocol, the same cannot be said about themes and plugins.
So, if you still see error messages, then the first thing you need to do is find out what is causing the problems.
Go to https://www.whynopadlock.com/ and enter the URL of the page that is giving the error message.
You’ll get a list all the insecure elements on your page and, when you look at the URLs of those insecure elements, you should hopefully see whether it’s a plugin or your theme from the URL – you will see the name of the plugin or theme in the URL.
You can also go to https://www.jitbit.com/sslcheck/ where it will crawl through your site and find all the pages with that have insecure connection issues.
Now there are 3 choices you can use to solve the issue:
- Contact the theme or plugin author to see if they will fix the issue, they can do this quickly using “protocol relative URLs.”
- Switch to a different theme or plugin. Note: if your theme or plugin is not loading scripts correctly then there may be other aspects of the theme or plugin that put your site at risk. It may be better for you to move on.
- Hire someone to modify the theme or plugin.
Do this for every page that gives you any insecure elements error messages.
Step 4: Let the World Know About the Change

Now that your site is fully SSL valid and all traffic is being forced to “HTTPS”, you’ll want to let the search engines like Google and Bing know about the change.
As mentioned previously, these search engines have been busy indexing all your pages and posts with “HTTP” for a long time. You need to let them know to start using secure connection links to your site.
There are a lot of online resources available for doing that, so I will just cover the overview:
- For Google, it is just a simple matter of creating a new site in Google’s Search Console (formerly called Webmaster Tools) with your updated HTTPS protocol. After you have added the HTTPS version successfully, you should keep the HTTP version in place to monitor how Google is handling the redirects and the future indexation of the site.
- For Bing, you just need re-submit a new HTTPS sitemap file to Bing Webmaster Tools.
Additional things you must update only if you’re using them:
- Content Delivery Network (CDN): If you’re using a CDN, like Cloudflare, you’ll need to do a URL update. The steps vary depending on which CDN you use but most will allow you to do a simple URL update to HTTPS.
- Google Analytics: Some analytics software is smart enough to recognize the change in URLs but, unfortunately, Google Analytics is not one of them. But fixing it is just a matter of flipping the URL to a HTTPS version.
- Facebook Apps: If you have a Facebook App running on your WordPress site, just head over to https://developers.facebook.com/apps to update the URL.
Other links you may need/want to update:
- Links in your YouTube Channel
- Links in your ad services like Google AdWords, Bing Ads or Facebook Ads
- Links in email and autoresponder accounts like Aweber, GetResponse or MailChimp
- Links in social media accounts like Facebook, Twitter, Pinterest, LinkedIn, Google+, etc.
Finally, you might also want to read our case study which outlines our SSL migration path and steps we had to take when moving from HTTP to HTTPS.
In Summary
Many people are moving their sites to secure connections for many of the reasons that were already mentioned and the number of people using secure connections on their sites is increasing every day.
It’s easy to use your installed SSL certificate to have your entire WordPress site use secure connection too. Just do these 4 steps to configure HTTPS:
- Let WordPress know you want to use them by changing the WordPress and Site URL settings.
- Force all connections to be secure using a plugin or your htaccess file.
- Change all “hard-coded” page elements from “HTTP” to “HTTPS” using a plugin.
- Let the Internet know about it by updating your search engine settings, your analytic settings, your CDN settings, and any other places that are applicable to your specific situation.
I want to thank my partner David Husnian for his assistance in reviewing, proof reading and suggestions.